


[originally appeared on THC Zine V.01]
by: Unkle F777
Cassette tape surgery is a loose, informal term that pertains to repairing the internal parts of a damaged cassette. Most of the people who know or have gone through this painstaking ordeal are mostly old (ha) individuals who have collected or still collects tapes. Most of the victims of this open cassette surgery operations are older tapes circa 80s to late 90s. But it could still happen to newer-pressed tapes.
While it isn’t exactly brain surgery to accomplish this task, those who are new to or inexperienced with this fine art of reconstructing or repairing damaged tapes may say it almost is.
Repairing these tapes, or reconstructing them involves at least three levels of difficulty.
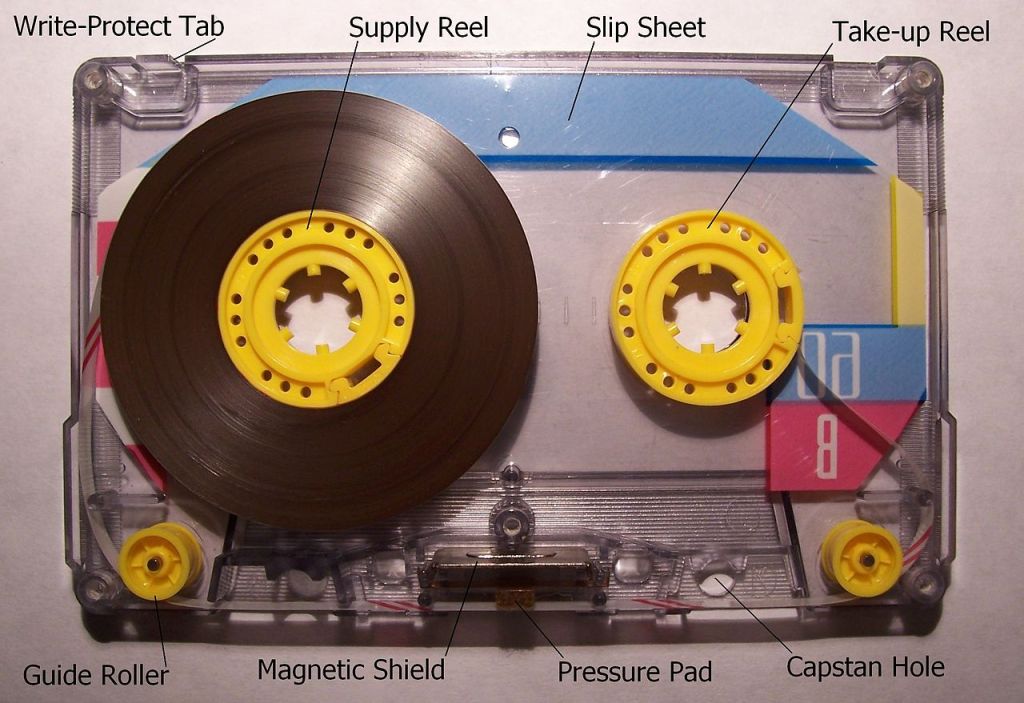
- Doing open cassette surgery to replace damaged or missing parts such as slip sheets, magnetic shields, pressure pads, or guide rollers,
- Repairing older model-types of supply or take up reels, which often applies to older Philippine-made cassettes that used inferior and cheap supply and take up reels. It consists of a circular side hole slot and an almost microscopic small plastic cylinder of the same size, where the plastic end of the actual cassette is sandwiched in between and fastened,
- Restoring damaged, torn, or spliced tape usually as a result of an accident from inferior cassette decks or walkmans.
By the way, this will only work on cassette tape types that have the five screws on it. Tough luck for those tapes with seamless screwless cases. You’ll need carefully pry it open with a cutter carefully, and have a replacement case ready.
You will need:
– A flat wide desk or tray that can hold all items, especially those with raised outer edges. A medium to big stoner’s rolling tray that is clean and dust-free will do. (ha)
– small to medium Philips screwdriver
– a bright adjustable overhead lamp to illuminate small parts (or your smartphone’s flashlight
– superglue adhesive / mighty bond extreme / loctite or similar items (for #2)
– high-quality scotch tape (for #3)
– tweezers (optional) for handling tiny parts
– perfume-free basic alcohol, to clean your hands and tweezers thoroughly to avoid grime, sweat, and dust from contaminating your cassette reel/spool
Basic Procedures
Level 1 Surgery
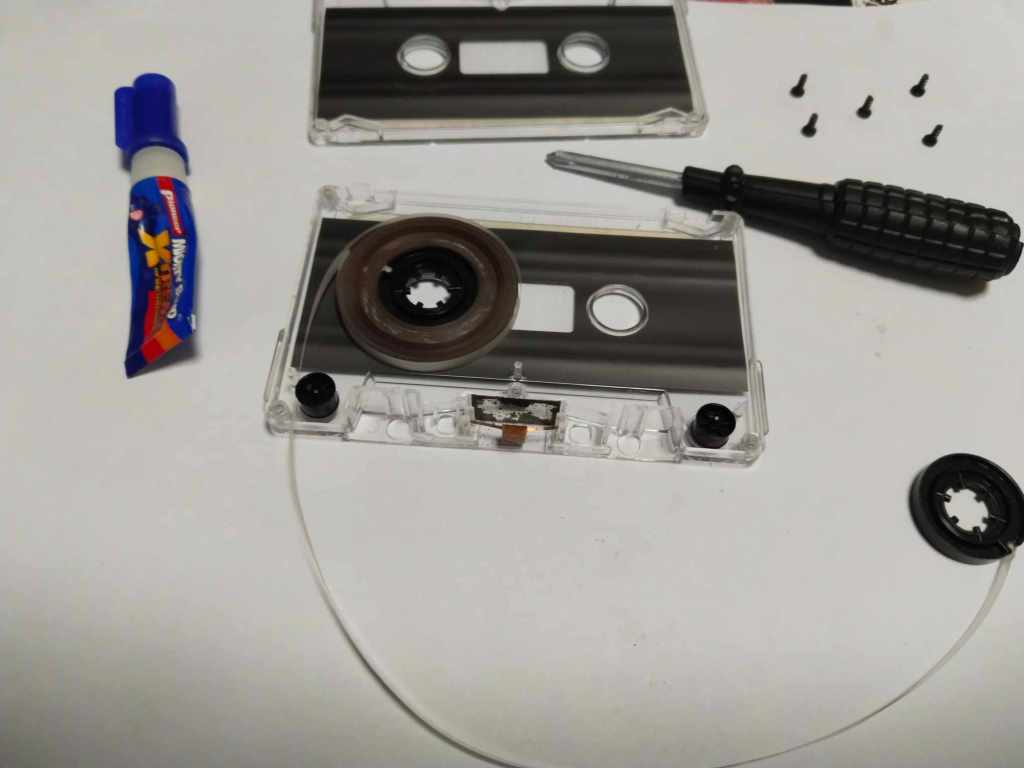
For level 1 cassette surgery, you just need to lay down the tape, screw surface up. Remove the screws, and place them in the location order of their placement in a corner of your workspace (see photo). Open the upper cover carefully along with the slip sheet and place it inner side up.
When your are replacing parts from a new cassette, make sure it’s already opened and the parts you will need for replacing are already removed and laid out. Carefully remove parts you need to remove and place the new replacement parts.
Carefully place back the cover. Align all parts including the cassette reel into the correct placement and inspect before closing it. Place each screw into each hole accordingly and make sure to screw them back carefully to avoid damaging the screw threading.
Level 2 Surgery

Often, older cassettes will snap at the take up reel. This can happen after reaching the end of one side, or when forwarding or rewinding a tape with a heavy duty cassette deck.
As you can see on this diagram, older tapes, especially local Philippines made ones from the 80s to late 90s used this construction type of cassette. They soon will give out and snap out the miniature cylinder tube that sandwiches the plastic end of the tape reel.
When this happens, don’t panic. Remove the tape from the deck, and don’t shake it. Follow the steps for properly opening the tape and carefully locate the small plastic cylinder. Put it back in the rolled/curved part of that cassette plastic end, and carefully snap it back into that space.
Apply a very small drop of superglue on the cylinder right next to the side that has the take up reel, and let it dry. Do the same on the other side of the cylinder and take up reel, and let it dry. Carefully test its strength and make sure it’s tight. Follow the steps in returning and closing the case, and test the cassette by rewinding, forwarding, and/or playing it. It should be good.
Level 3 Surgery
This type of cassette surgery is almost exactly like the one used by analog recording engineers when splicing and putting together analog 2 inch recording tape. The same concept applies when your cassette deck has week rollers, or the take up reel fails, feeding the tape into the rolling mechanism of the cassette, and damaging the tape.
In case this happens, once it eats up the tape, stop the deck immediately. Survey the situation and see if you can carefully pull out the tape. Some tape decks have spring loaded rolling pins and you can push it down slightly to free the cassette.
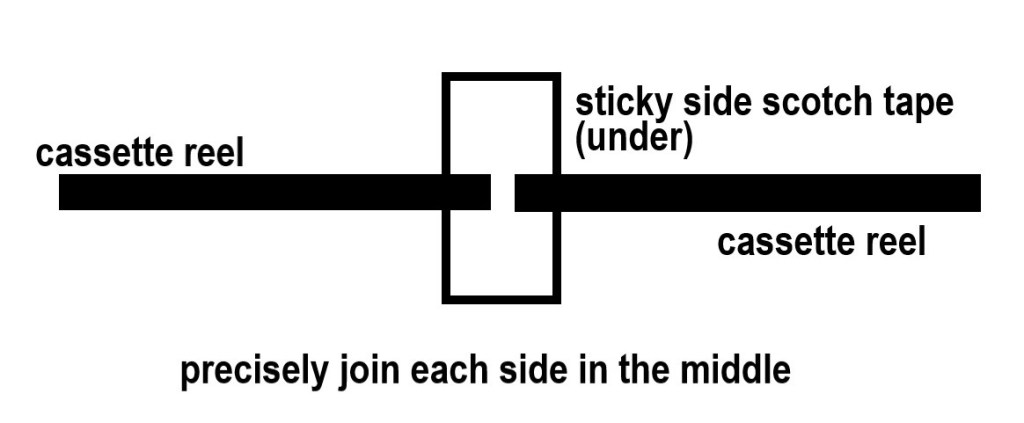
If the tape reel is whole, in worst case scenario, you will have a slightly mangled tape that may still work. If it snaps in half, remove the whole cassette and tape reel. Manually pull out both disconnected sides and lay them down a flat surface and make sure they are flat down. Make sure they are both facing up on their correct side.
Cut a small piece of scotch tape and align it at the bottom of one damaged side and stick it correctly. Carefully place the other side of the cassette reel on the other side. Join them precisely in the middle as most as possible without any gaps or else the scotch tape will stick to the cassette deck head. Then, cut excess scotch tape carefully. This should be strong enough to hold both sides and the damage will be barely noticeably heard.
For cassette care tips, check out my other previous article here. It can avoid these types of cassette tape damage. Good night.


Leave a comment